
This post may contain affiliate links. If you click on a link and make a purchase, I may receive a small commission at no extra cost to you. For more information, please read my disclaimer here.
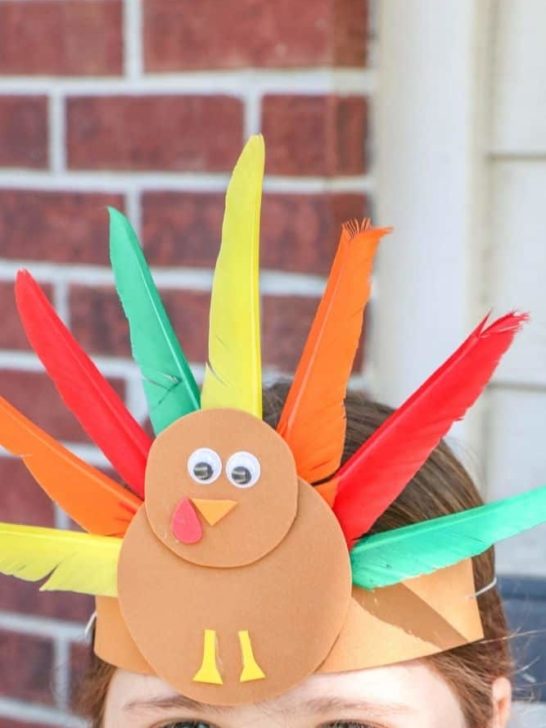
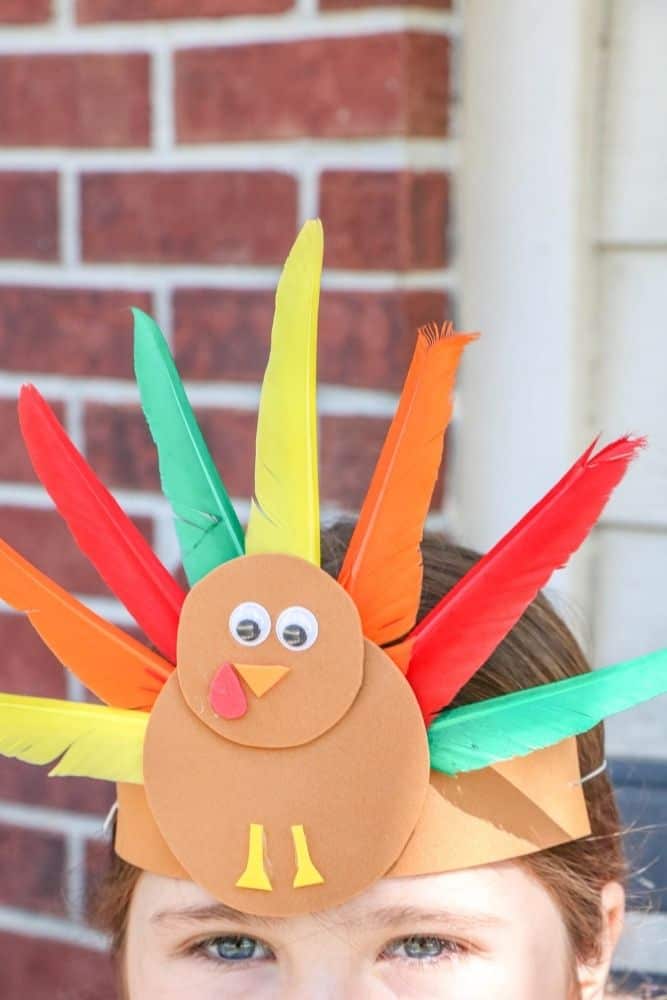
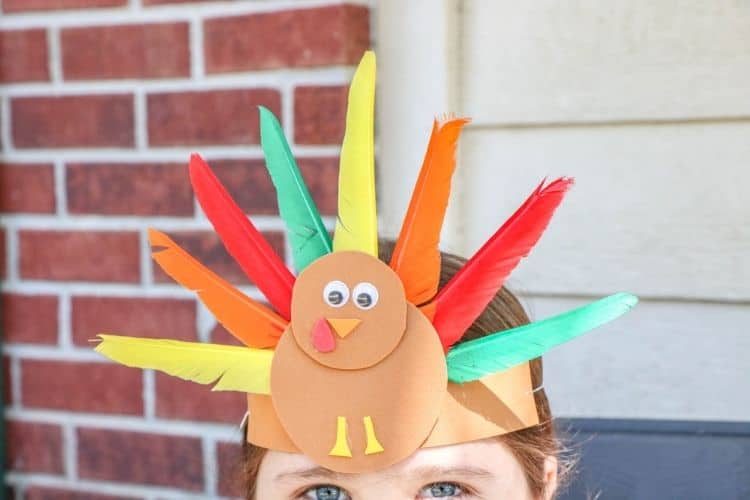
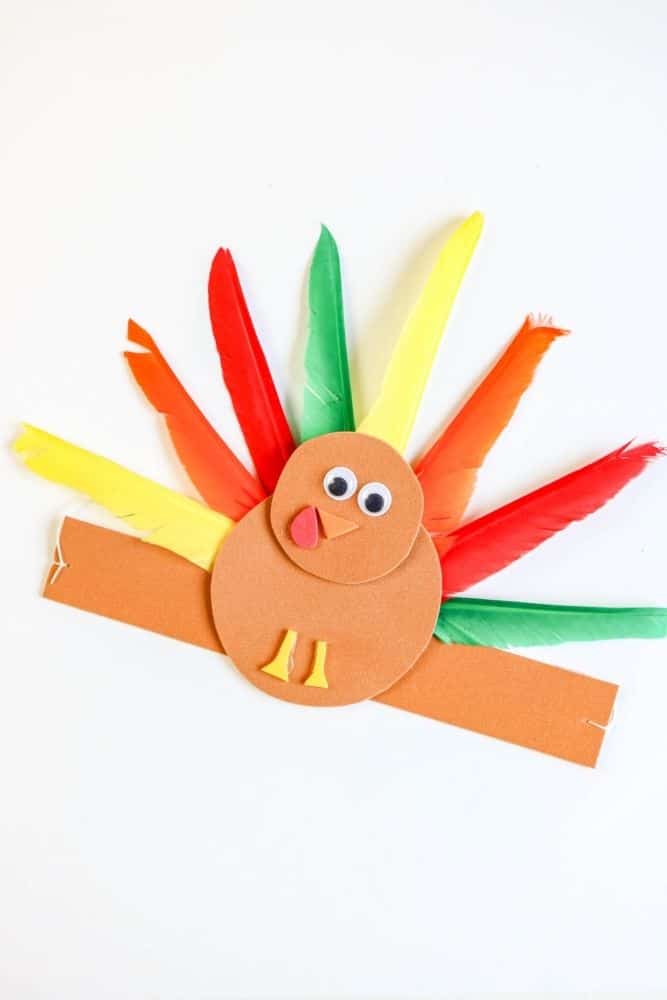
A fun Thanksgiving Turkey Headband that’s easy to make and fun for the kids to wear around!
Thanksgiving is right around the corner and what better way to get the kids to celebrate than to make this foam turkey headband together?
Even the little ones as young as 2 years old can make put this simple Thanksgiving headband together with some guidance and support.
Learn how to make this Thanksgiving turkey headband step-by-step while educating your kids about what Thanksgiving is all about.
And here’s a bonus: they’re also developing their fine motor and listening skills! Don’t worry if your craft doesn’t turn out 100% perfect. Let your child make it their own!
They’ll be happier. I promise. And… if you’re one of the mom’s who just NEEDS it to look great, make TWO! Trust me, I do it too at times.
Looking for other easy crafts to make this Thanksgiving holiday? Take a look at the Best Thanksgiving Crafts for 2-Year-Olds!
Tips to Make This Foam Turkey Craft with Toddlers
- Have your child (or you) gather all the supplies right at the beginning
- Toddler have a small attention span, so cut out everything ahead of time so they don’t lose interest
- Use a plastic table cloth to avoid messes on the table. We use the same table cloth over and over again for about a year before we need to replace it.
- Have your kids wear an art smock like this Crayola Creativity Smock I use. It keeps them clean and when they are done, you just wash their hands and they’re set to go!
- Take control of the glue. As much as I like my child to get experience with glue, if your glue comes out quickly, just help them out by doing that part for them. Better yet, just use glue dots.
- Cut everything ahead of time. This will keep your child’s attention as they can take part in every piece of the craft instead of waiting for you to cut each piece of foam.
- This is a three-part craft, which is perfect for toddlers! Have everything prepped and ready to go. Then stop while everything is drying and come back to finish it later in the day.
It’s a great way to work with short attention spans.
Tips to Make This Thanksgiving Craft with Older Kids
- Start by listing out the items needed for the craft and have them find each supply needed.
- Let the kids do thet tracing and cutting! I like to draw what I’m about to cut ahead of time so I don’t mess up while cutting. I recommend the kids do the same.
- Let them have free reign on this turkey project – let them make their own mistakes and only step in if they become frustrated or ask for help.
Related Articles:
- Insanely Cute Turkey Treats
- Paper Bag Turkey Craft
- The Best Thanksgiving Books for Toddlers
- All of the Best Air Fryer Recipes to Make on Thanksgiving
- Super Fun Board Games for 2-Year-Olds
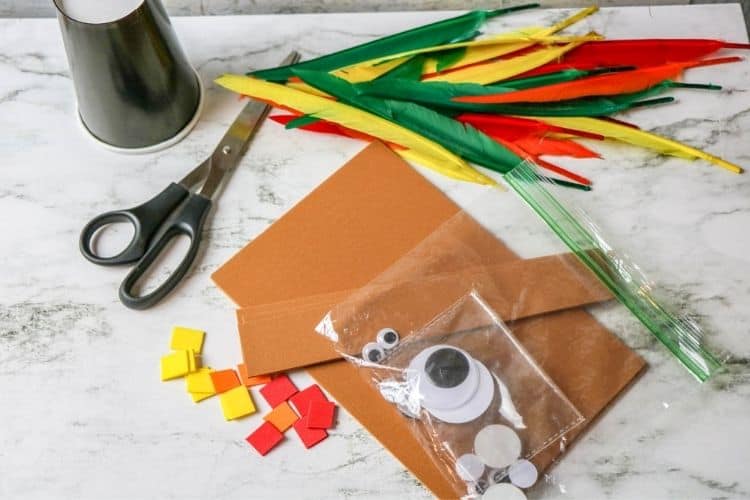
Supplies You Will Need:
- Foam craft sheets in the following colors: brown, yellow, red, and orange
- Paper cup or another cup that is smaller on the bottom than at the top
- Pencil or pen for drawing before you cut
- Scissors
- Foam glue or glue dots (they work the best to stick the foam together!)
- 2 wiggly eyes
- Faux feathers in different colors
- Elastic string
How to Make This Foam Turkey Headband Craft
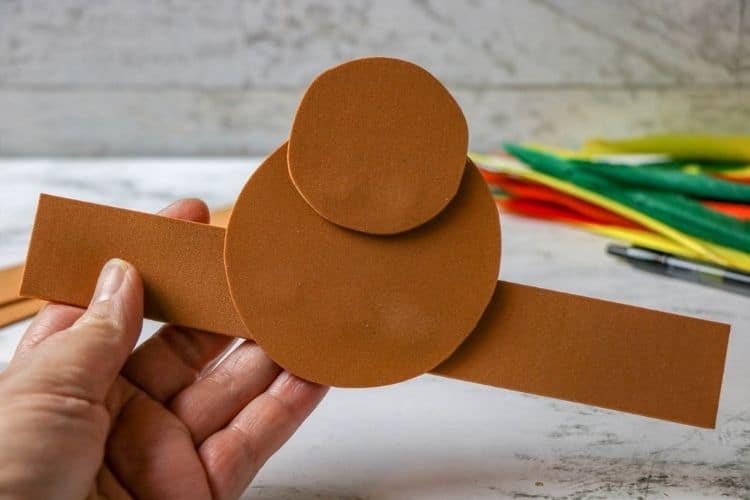
- STEP ONE: Cut the brown foam into a long strip that is 2 inches wide by 8 inches long. It won’t be long enough to fit around your child’s head. This will be where the elastic string comes in at the end.
- STEP TWO: Cut the red foam into a waddle. You can make it look like a teardrop as shown in the picture or more of a squiggly line, like in this Paper Bag Turkey Craft. Either will look great.
- STEP THREE: Now, cut the orange foam into a triangle beak and the yellow foam into two legs. Let your kids get creative with each piece they cut.
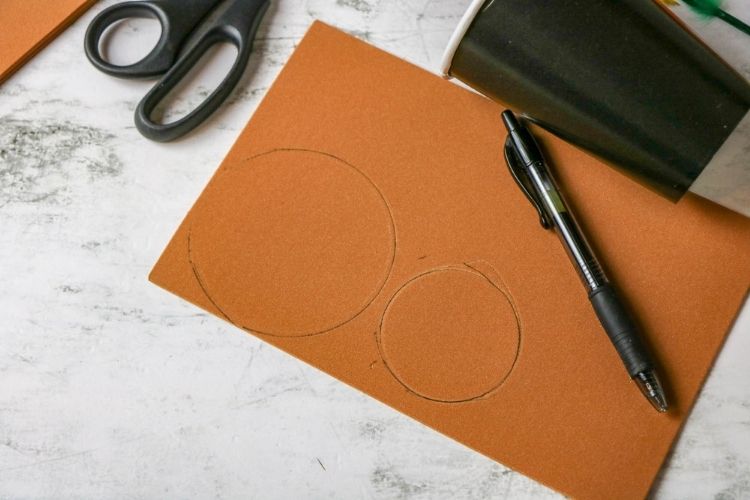
- STEP FOUR: Using the paper cup, trace two circles on the brown foal– one using the top of the cup and one using the bottom. This will be used as the turkey’s head and body. Cut each circle out.
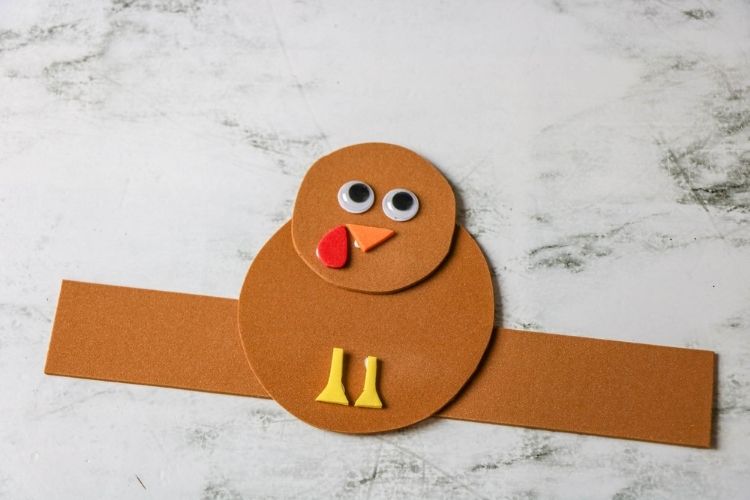
- STEP FIVE: Glue the smaller circle over the big one then glue the circles onto the middle of the foam strip. On the smaller circle, glue the wiggly eyes, beak, and waddle. On the larger circle, glue the feet.
Allow to dry completely.
- STEP SIX: Flip the headband over and attach the feathers to the back of the turkey so they’re sticking out the top. Let the glue on the feathers dry completely.
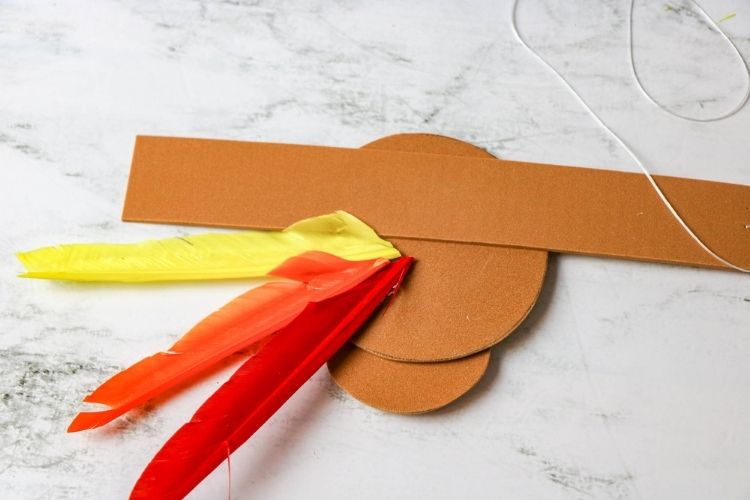
- STEP SEVEN: Poke a small hole into each side of the brown foam strip. You want the hole just large enough to fit the string, so I don’t recommend using a normal hole puncher for this one. A needle or very small hole puncher will work.
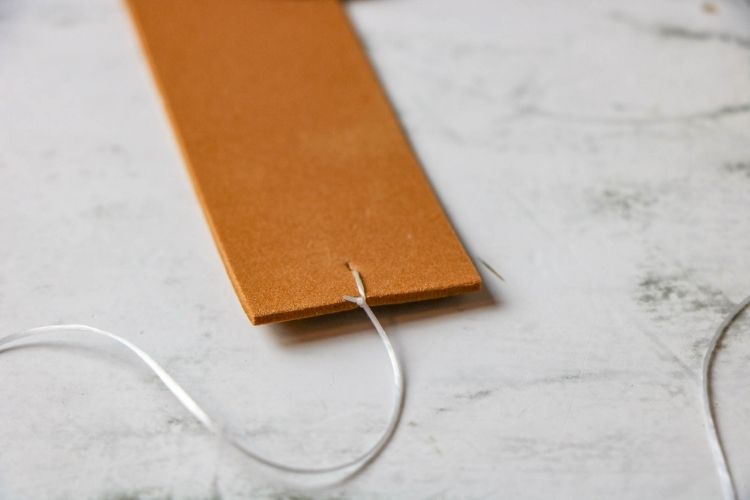
- STEP EIGHT: Tie the string through the holes on the foam piece. This will make the hat one-size fits all!
I like to tie one side of the string then measure it out on my daughter’s head to see how much elastic I will need.
Then I take a few inches off and tie it off to allow for some stretch and cut off the excess.
Now, they can wear this hat around all day long!
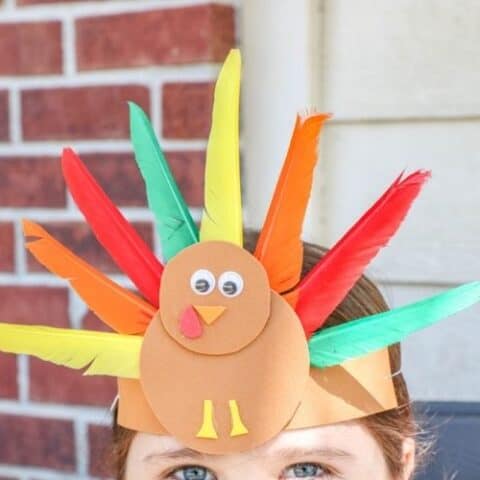
Thanksgiving Foam Turkey Headband
A fun and easy Thanksgiving foam turkey headband craft for kids of all ages.
Materials
- Foam Craft Sheets in brown, yellow, red, and orange
- Paper cup or another cup that is smaller on the bottom than at the top
- Foam glue or glue dots (they work the best to stick the foam together!)
- 2 wiggly eyes
- Faux feathers in different colors
- Elastic string
Tools
- Pencil or pen for drawing before you cut
- Scissors
- Mini Hole Puncher or Needle
Instructions
- Cut the brown foam into a long strip that is 2 inches wide by 8 inches long.
- Cut the red foam into a waddle. You can make it look like a teardrop as shown in the picture or more of a squiggly line.
- Cut the orange foam into a triangle beak and the yellow foam into two legs.
- Using the paper cup, trace two circles on the brown foal– one using the top of the cup and one using the bottom. Cut each circle out.
- Glue the smaller circle over the big one then glue the circles onto the
middle of the foam strip. On the smaller circle, glue the wiggly eyes,
beak, and waddle. On the larger circle, glue the feet.Allow to dry completely. - Flip the headband over and attach the feathers to the back of the turkey
so they’re sticking out the top. Let the glue on the feathers dry
completely. - Poke a small hole into each side of the brown foam strip. You want the hole just large enough to fit the string.
- Tie the string through the holes on the foam piece. This will make the hat one-size fits all!
Erin Evans
Tuesday 17th of November 2020
Great kids craft! Thanks for the simple and easy to follow instructions. Happy Thanksgiving!